Today I’ll show you how to get Google to “crawl” your website in order to be ranked high and viewed by as many people as possible. This Google Webmasters and WordPress quick guide will help you step-by-step.
As soon as you’ve published your new post, follow the steps below and your new page will be ranked by Google literally within minutes. Not on the 1st page easily, but depending how long-tailed the key phrase is, it is possible for your post to be ranked on the 1st page of Google in a short period of time.
Google Webmasters And WordPress Quick Guide
As I mentioned in the title, I hope this post is particularly useful for WordPress users. The first section shows how to create a sitemap using a WordPress plugin.
Find Your Sitemap File(s)
A Sitemap is a file that lists all the URLs for a site, allowing search engines (Google Bing, Yahoo) to crawl the site intelligently.
You would have a complete SEO WordPress plugin such as All In One SEO or Yoast SEO. If not, installing one of these two is highly recommended. I personally prefer Yoast – setting up is a little more complicated than the All In One, but it gives you more versatility and in-depth analysis of your web posts.
If you are an All In One SEO user;
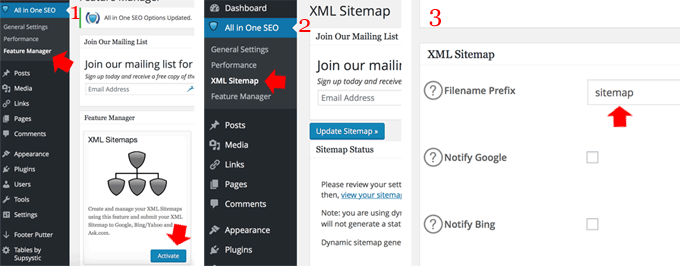
- Under the menu, click “Feature Manager”, and activate “XML Sitemaps”.
- “XML Sitemap” will appear in the menu on the left. Click it.
- Scroll down the main window where it says XML Sitemap > Filename Prefix, just type in “sitemap”. Click “Update Sitemap” (there is a button either side towards the top and the bottom of the screen).
Open a new browser tab, type in yoursite.com/sitemap.xml and you’ll be able to see your sitemap, i.e. list of your web pages. This is the file that needs to be submitted to Google, which I’ll explain in a minute.
If you are a Yoast SEO user;
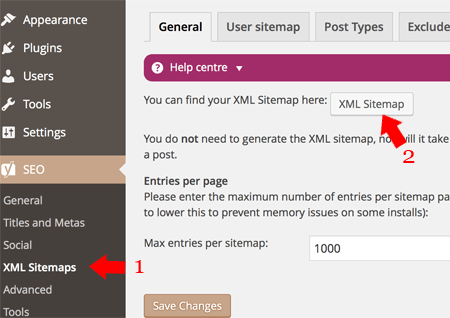
- Under the SEO menu – click XML Sitemaps.
- Click this button (“XML Sitemap”), and it will open a new tab for you to view your Sitemap files, created already.
With Yoast, there are several sub-sitemap files under the sitemap index file. The address in the new tab should show yoursite.com/sitemap_index.xml. And this is the file that should be submitted to Google, explained to you below.
Google Webmaster
Now go to https://www.google.com/webmasters, and log in to your Google account.
#1 Add Your Website To Google Webmaster – Search Console
Next add your website address.
Enter your site name without www (e.g. http://yoursite.com) and click “Add Property”.
#2 Verify The Ownership Of Your Website
Once your website’s been added, the Webmaster will ask you to verify that you are the owner of the site.
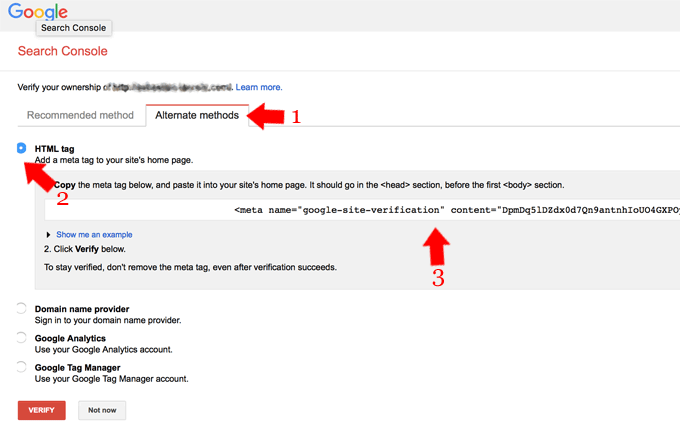
With “Recommended method”, unfortunately you’ll likely to receive an error message if using All In One SEO or Yoast SEO (you could try, as it’s the easiest option). My recommended method is to go for an alternative method.
- Click “Alternate method” tab
- Choose HTML Tag option
- Highlight this entire code <meta name=”google-site……………..> and copy. This code needs to be pasted onto your header section.
Now go back to your WordPress.
- Under Appearance menu, click Editor.
- On the right-hand menu, click to choose “Theme Header“.
- The code in the Google Webmaster that you copied needs to be inserted within <head> </head> tag, therefore find where it says < /head>, about 1/3 down from the top.
- Just before the < /head>, paste the code <meta name=”google-site……………..>
Now go back to Google Webmaster again and click the red “Verify” button. Your site ownership should now be verified.
Click “Continue”.
Submit Your Sitemap
#1 Test and Add Sitemap
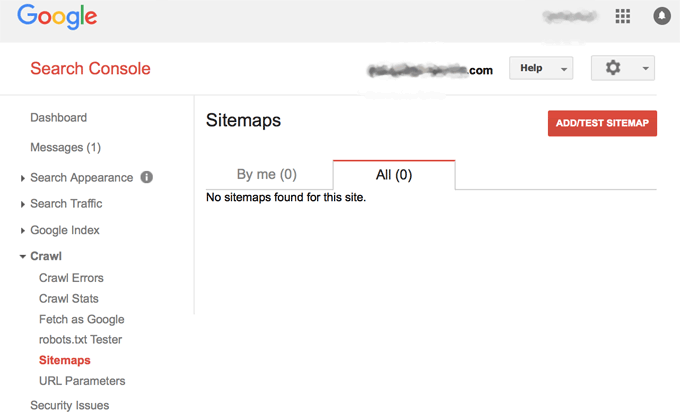
Now in the left-hand menu, you’ll find “Sitemaps” under “Crawl“. Here you can test your sitemap, and then add it.
Click the red “Add/Test Sitemap” button on the right.

Here, you type in your sitemap file name, as explained in the beginning. If you use All In One SEO, type in sitemap.xml and click “Test”. I use Yoast SEO, so I type in sitemap_index.xml as shown.
If there’s no error found, like shown above, then do it again – click the “Add/Test Sitemap” button again, type in sitemap.xml or sitemap_index.xml and click Submit.
 #2 If Error Is Found
If a sitemap error is found, it will show you which page the error contains. It’s likely that there is a dead link in the page, and you need to go back to WordPress and check the links in that particular page.
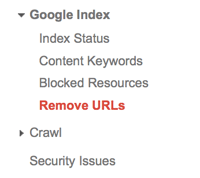
In the left-hand menu under “Google index”, you’ll find “Remove URLs“, where you can request to remove any particular URL with broken link. Google will reanalyse the link and remove the URL from your sitemap.
After the sitemap submission, your website will be indexed by Google within 24 hours. You only need to submit your sitemap once. Thereafter, you only need to resubmit it when you’ve made a major change to your website such as the URL structure.
“Fetch As Google” – Submit Your URLs
Now this is something you need to do every time you’ve published a new article. It may sound like a job to do, but after a few times it will become a second nature to you. As soon as you publish a new post, log straight in to Google Webmaster and submit!

- Under “Crawl” menu on the right, click “Fetch as Google“.
- In the box, enter the permalink of your post. That is any words and “/-” that follow your website URL, for example, http://yoursite.com/your-post.
- “Desktop” or “Mobile” – most likely leave this bit as Desktop, as you’ve created and published your post in WordPress on desktop. If posted using a smartphone device, you need to change it accordingly.
- Click “Fetch“.
- Submit to Index (see below)

“Fetch” or “Fetch and Render”
When you use the “Fetch and Render” button, the Webmaster will tell you about other elements that Google cannot see, such as JavaScript codes and CSS files that indirectly linked to the website.
I don’t use “Fetch and Render” button as I don’t have any complex plugins using external resources to my site. After Fetch and Render, the Webmaster will show you two images; one that Google will see and the other one that your visitor will see. But shown below, there’s no difference in between the two for my home page.
Fetch and Render is useful to diagnose crawling errors that may cause a poor performance in search results. So if your article has been submitted to Google via Webmaster, but strangely unranked, this is something you can do to see if there are any errors.
That Is It!
Congratulations, now you have submitted your published post to Google, and you will hopefully see it ranked somewhere in the Google Search, providing the sitemap has already been indexed and crawled. Leave it for 15 minutes or so and see if it’s there. If not, keep checking over the next few hours – few days.
Any questions, don’t hesitate to leave your comment below.





Your content is very impressive and thanks for sharing this article. its very useful.
Thank you! I appreciate your support!
Hello Ray
You have a nice website here to learn how to get Google to crawl my website. However, I’m stuck at adding my website to Google Webmaster. After clicking on “Add Property” I get a message on the top saying something like “You will be getting an email on the next steps to take.” I have been waiting for about 15 minutes as of making this comment. I was wondering if you can tell me if this wait is normal.Thanks.
Armand
Hi Armand,
Sounds like something’s wrong but I can’t work that out.
To test it, I just signed in with my old Gmail account that had never been linked to the Webmaster. I then created a brand new free website, and I was able to add the website to the Webmaster straight away. It never mentioned about email that I’d be receiving.
There is a help page specifically for adding a property (=your website), but it doesn’t mention you may or may not receive an email upon addition.
https://support.google.com/webmasters/answer/34592?hl=en
You might want to contact them directly if it doesn’t let you add any websites at all? Sorry I can’t be any of help at this stage, if you give me more detail, I’ll have a further look. Contact me at info@cybercashworldwide.com.
Ray
Hi Ray,
I was actually able to figure out what the problem was. I didn’t need to go and check my email for those “instructions” that was supposedly sent by them (which I never got). I just had to search through that webmasters page and find the meta name and input that in my header page. Thanks for responding though, I appreciate it.
Armand
Oh good, I’m glad it’s sorted, Armand. Yes the meta tag is shown under “alternate method” tab. Thanks for letting me know!
Ray